This is the 6th part of our ongoing Logical Volume Management
series, in this article we will show you how to migrate existing logical
volumes to other new drive without any downtime. Before moving further,
I would like to explain you about LVM Migration and its features.
Now if we need to upgrade our server with SSD Hard-drive, what we used to think at first? reformat of disk? No! we don’t have to reformat the server. The LVM has the option to migrate those old SATA Drives with new SSD Drives. The Live migration will support any kind of disks, be it local drive, SAN or Fiber channel too.


Note: Did you see in the above screen, that the new drive has been added successfully with name “/dev/sda“.

Note: For demonstration purpose, we’ve created two files under /mnt/lvm mount point, and we migrate these data to a new drive without any downtime.
4. Before migrating, make sure to confirm the names of logical volume and volume group for which physical volume is related to and also confirm which physical volume used to hold this volume group and logical volume.

Note: Did you see in the above screen, that “vdb” holds the volume group tecmint_vg.

6. Next, add the newly created physical volume to existing volume group tecmint_vg using ‘vgextend command’

7. To get the full list of information about volume group use ‘vgdisplay‘ command.

Note: In the above screen, we can see at the end of result as our PV has added to the volume group.
8. If in-case, we need to know more information about which devices are mapped, use the ‘dmsetup‘ dependency command.

Note: In the above command, we can see that major number with 252 and minor number 17 is related to vdb1. Hope you understood from above command output.

Note: The above migration process will take long time according to our volume size.
10. Once migration process completed, verify the converted mirror.

11. Once you sure that the converted mirror is perfect, you can remove the old virtual disk vdb1. The option -m will remove the mirror, earlier we’ve used 1 for adding the mirror.

12. Once old virtual disk is removed, you can re-check the devices for logical volumes using following command.

In the above picture, did you see that our logical volume now depends on 8,1 and has sda1. This indicates that our migration process is done.
13. Now verify the files that we’ve migrated from old to new drive. If same data is present at the new drive, that means we have done every steps perfectly.
14. After everything perfectly created, now it’s time to delete the vdb1 from volume group and later confirm, which devices are depends on our volume group.

source: http://www.tecmint.com/lvm-storage-migration/

What is LVM Migration?
LVM migration is one of the excellent feature, where we can migrate the logical volumes to a new disk without the data-loss and downtime. The purpose of this feature is it to move our data from old disk to a new disk. Usually, we do migrations from one disk to other disk storage, only when an error occur in some disks.Features of Migration
- Moving logical volumes from one disk to other disk.
- We can use any type of disk like SATA, SSD, SAS, SAN storage iSCSI or FC.
- Migrate disks without data loss and downtime.
Now if we need to upgrade our server with SSD Hard-drive, what we used to think at first? reformat of disk? No! we don’t have to reformat the server. The LVM has the option to migrate those old SATA Drives with new SSD Drives. The Live migration will support any kind of disks, be it local drive, SAN or Fiber channel too.
Requirements
- Creating Flexible Disk Storage with Logical Volume Management – Part 1
- How to Extend/Reduce LVM’s in Linux – Part 2
My Server Setup
Operating System : CentOS 6.5 Final
IP Address  : 192.168.0.224
System Hostname  : lvmmig.tecmintlocal.com
Step 1: Check for Present Drives
1. Assume we are already having one virtual drive named “vdb“, which mapped to one of the logical volume “tecmint_lv“. Now we want to migrate this “vdb” logical volume drive to some other new storage. Before moving further, first verify that the virtual drive and logical volume names with the help of fdisk and lvs commands as shown.# fdisk -l | grep vd # lvs
Check Logical Volume Disk
Step 2: Check for Newly added Drive
2. Once we confirm our existing drives, now it’s time to attach our new SSD drive to system and verify newly added drive with the help of fdisk command.# fdisk -l | grep dev
Check New Added Drive
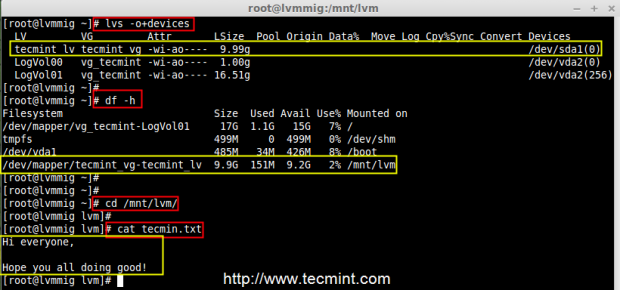
Step 3: Check Present Logical and Physical Volume
3. Now move forward to create physical volume, volume group and logical volume for migration. Before creating volumes, make sure to check the present logical volume data under /mnt/lvm mount point. Use the following commands to list the mounts and check the data.# df -h # cd /mnt/lvm # cat tecmint.txt
Check Logical Volume Data
4. Before migrating, make sure to confirm the names of logical volume and volume group for which physical volume is related to and also confirm which physical volume used to hold this volume group and logical volume.
# lvs
# vgs -o+devices | grep tecmint_vg
Confirm Logical Volume Names
Step 4: Create New Physical Volume
5. Before creating Physical Volume in our new added SSD Drive, we need to define the partition using fdisk. Don’t forget to change the Type to LVM(8e), while creating partitions.# pvcreate /dev/sda1 -v # pvs
Create Physical Volume
# vgextend tecmint_vg /dev/sda1
# vgs
Add Physical Volume
# vgdisplay tecmint_vg -v
List Volume Group Info
8. If in-case, we need to know more information about which devices are mapped, use the ‘dmsetup‘ dependency command.
# lvs -o+devices
# dmsetup deps /dev/tecmint_vg/tecmint_lv
In the above results, there is 1 dependencies (PV) or (Drives) and here 17 were listed. If you want to confirm look into the devices, which has major and minor number of drives that are attached.
# ls -l /dev | grep vd
List Device Information
Step 5: LVM Mirroring Method
9. Now it’s time to do migration using Mirroring method, use ‘lvconvert‘ command to migrate data from old logical volume to new drive.# lvconvert -m 1 /dev/tecmint_vg/tecmint_lv /dev/sda1
- -m = mirror
- 1 = adding a single mirror
Mirroring Method Migration
10. Once migration process completed, verify the converted mirror.
# lvs -o+devices

Verify Converted Mirror
# lvconvert -m 0 /dev/tecmint_vg/tecmint_lv /dev/vdb1
Remove Virtual Disk
# lvs -o+devices
# dmsetup deps /dev/tecmint_vg/tecmint_lv
# ls -l /dev | grep sd

Check New Mirrored Device
13. Now verify the files that we’ve migrated from old to new drive. If same data is present at the new drive, that means we have done every steps perfectly.
# cd /mnt/lvm/
# cat tecmin.txt

Check Mirrored Data
# vgreduce /dev/tecmint_vg /dev/vdb1
# vgs -o+devices
15. After removing vdb1 from volume group tecmint_vg, still our logical volume is present there because we have migrated it to sda1 from vdb1.
# lvs
Delete Virtual Disk
Step 6: LVM pvmove Mirroring Method
16. Instead using ‘lvconvert’ mirroring command, we use here ‘pvmove‘ command with option ‘-n‘ (logical volume name) method to mirror data between two devices.# pvmove -n /dev/tecmint_vg/tecmint_lv /dev/vdb1 /dev/sda1The command is one of the simplest way to mirror the data between two devices, but in real environment Mirroring is used more often than pvmove.
Conclusion
In this article, we have seen how to migrate the logical volumes from one drive to other. Hope you have learnt new tricks in logical volume management. For such setup one should must know about the basic of logical volume management. For basic setups, please refer to the links provided on top of the article at requirement section.source: http://www.tecmint.com/lvm-storage-migration/
Комментариев нет:
Отправить комментарий